저는 오라클 클라우드 서버를 무료로 사용중에 있습니다. 성능은 느리지만 오라클 클라우드는 평생 무료 서버를 제공해 줍니다. 물론 과정은 조금 힘들었는데, 현재는 오라클에서 평생 무료 서버를 할당 받아서 사용중입니다.
여기에서 크롬을 설치할 필요가 생겼습니다. 그래서, 오늘은 GUI가 없는 우분투에서 CLI를 사용하여 Google Chrome을 설치하는 방법을 알아보고 하나씩 따라해 보도록 하겠습니다.
Table Of Contents
1. 필수 패키지 설치
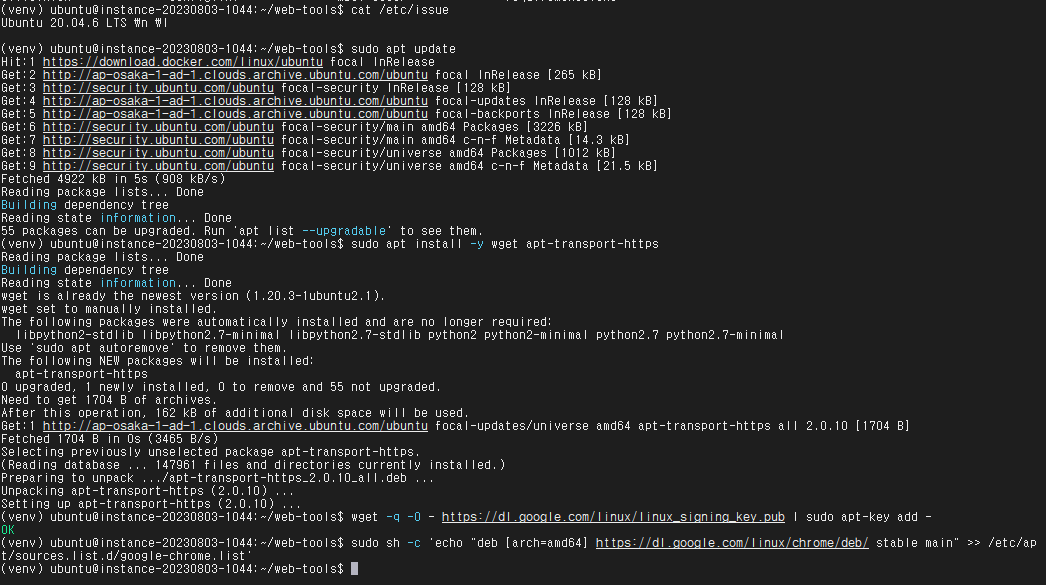
Google Chrome을 설치하려면 wget과 apt-transport-https 패키지가 필요합니다. 이 패키지들이 없다면 먼저 설치합니다.
(venv) ubuntu@instance-20230803-1044:~/web-tools$ sudo apt update
Hit:1 https://download.docker.com/linux/ubuntu focal InRelease
Get:2 http://ap-osaka-1-ad-1.clouds.archive.ubuntu.com/ubuntu focal InRelease [265 kB]
Get:3 http://security.ubuntu.com/ubuntu focal-security InRelease [128 kB]
Get:4 http://ap-osaka-1-ad-1.clouds.archive.ubuntu.com/ubuntu focal-updates InRelease [128 kB]
Get:5 http://ap-osaka-1-ad-1.clouds.archive.ubuntu.com/ubuntu focal-backports InRelease [128 kB]
Get:6 http://security.ubuntu.com/ubuntu focal-security/main amd64 Packages [3226 kB]
Get:7 http://security.ubuntu.com/ubuntu focal-security/main amd64 c-n-f Metadata [14.3 kB]
Get:8 http://security.ubuntu.com/ubuntu focal-security/universe amd64 Packages [1012 kB]
Get:9 http://security.ubuntu.com/ubuntu focal-security/universe amd64 c-n-f Metadata [21.5 kB]
Fetched 4922 kB in 5s (908 kB/s)
Reading package lists... Done
Building dependency tree
Reading state information... Done
55 packages can be upgraded. Run 'apt list --upgradable' to see them.
(venv) ubuntu@instance-20230803-1044:~/web-tools$ sudo apt install -y wget apt-transport-https
Reading package lists... Done
Building dependency tree
Reading state information... Done
wget is already the newest version (1.20.3-1ubuntu2.1).
wget set to manually installed.
The following packages were automatically installed and are no longer required:
  libpython2-stdlib libpython2.7-minimal libpython2.7-stdlib python2 python2-minimal python2.7 python2.7-minimal
Use 'sudo apt autoremove' to remove them.
The following NEW packages will be installed:
  apt-transport-https
0 upgraded, 1 newly installed, 0 to remove and 55 not upgraded.
Need to get 1704 B of archives.
After this operation, 162 kB of additional disk space will be used.
Get:1 http://ap-osaka-1-ad-1.clouds.archive.ubuntu.com/ubuntu focal-updates/universe amd64 apt-transport-https all 2.0.10 [1704 B]
Fetched 1704 B in 0s (3465 B/s)
Selecting previously unselected package apt-transport-https.
(Reading database ... 147961 files and directories currently installed.)
Preparing to unpack .../apt-transport-https_2.0.10_all.deb ...
Unpacking apt-transport-https (2.0.10) ...
Setting up apt-transport-https (2.0.10) ...
2. Google Chrome의 GPG 키 추가
Google의 공식 GPG 키를 추가하여 패키지를 인증할 수 있도록 합니다.
wget -q -O - https://dl.google.com/linux/linux_signing_key.pub | sudo apt-key add -
(venv) ubuntu@instance-20230803-1044:~/web-tools$ wget -q -O - https://dl.google.com/linux/linux_signing_key.pub | sudo apt-key add -
OK
3. Google Chrome의 소스 리스트 추가
Google Chrome 패키지 소스 URL을 우분투의 패키지 관리에 추가합니다.
sudo sh -c 'echo "deb [arch=amd64] https://dl.google.com/linux/chrome/deb/ stable main" >> /etc/apt/sources.list.d/google-chrome.list'
4. Chrome 설치
이제 다시 패키지 리스트를 업데이트하고 Google Chrome을 설치합니다.
sudo apt update
sudo apt install -y google-chrome-stable
(venv) ubuntu@instance-20230803-1044:~/web-tools$ sudo apt update
Hit:1 https://download.docker.com/linux/ubuntu focal InRelease
Get:2 https://dl.google.com/linux/chrome/deb stable InRelease [1825 B]
Hit:3 http://security.ubuntu.com/ubuntu focal-security InRelease
Get:4 http://ap-osaka-1-ad-1.clouds.archive.ubuntu.com/ubuntu focal InRelease [265 kB]
Get:5 https://dl.google.com/linux/chrome/deb stable/main amd64 Packages [1083 B]
Get:6 http://ap-osaka-1-ad-1.clouds.archive.ubuntu.com/ubuntu focal-updates InRelease [128 kB]
Get:7 http://ap-osaka-1-ad-1.clouds.archive.ubuntu.com/ubuntu focal-backports InRelease [128 kB]
Fetched 523 kB in 3s (209 kB/s)
Reading package lists... Done
Building dependency tree
Reading state information... Done
55 packages can be upgraded. Run 'apt list --upgradable' to see them.
5. 확인
설치가 완료되면 google-chrome --version 명령어로 Chrome 설치가 제대로 되었는지 확인할 수 있습니다.
(venv) ubuntu@instance-20230803-1044:~/web-tools$ which google-chrome
/usr/bin/google-chrome
(venv) ubuntu@instance-20230803-1044:
google-chrome --version

이로써, CLI를 통해 우분투 서버에 Google Chrome을 설치했습니다.
6. 크롬 실행 테스트
우분투 서버에서 passive로 Chrome을 실행해서 서버에서 실행한 크롬을 내 노트북에 띄워봤습니다.
이렇게 해서 네이버에 접속해 보았는데, 한글 사이트 접속 시 한글이 깨지는 문제는 발생합니다.
이는 폰트가 제대로 설치되지 않았기 때문일 수 있습니다. 이를 해결하려면 한글 폰트를 설치하고, Chrome에 적용해 주면 됩니다. 다음 단계를 따라 해결할 수 있습니다.
7. 한글 폰트 설치
ttf-unfonts-core 및 fonts-nanum 패키지를 설치하여 한글 폰트를 시스템에 추가합니다.
sudo apt update
sudo apt install -y fonts-nanum fonts-unfonts-core
8. 폰트 캐시 갱신
폰트를 설치한 후 폰트 캐시를 갱신합니다.
sudo fc-cache -fv
9. Chrome 재시작
Chrome이 이미 실행 중이라면, 재시작한 후 한글 사이트에 다시 접속하여 한글이 제대로 표시되는지 확인합니다.
이제 오라클 우분투 서버에 크롬을 설치하고 로컬 노트북에서 크롬 GUI를 띄워보았습니다.
아래와 같이 네이버 사이트에 잘 접속되고 한글도 잘 나오는 것을 확인하였습니다.

gpu를 사용하기 어려운 환경이나 에러가 발생하면 아래와 같이 몇 가지 옵션을 꺼서 실행에러를 방지할 수도 있습니다. 참고하세요!
google-chrome --no-sandbox --disable-gpu
아래와 같이 몇가지 gpu 관련 에러가 사라졌습니다.

오늘은 우분투 리눅스에서 구글 크롬을 설치하고 테스트 해보는 방법을 알아봤습니다. 우분투에는 기본적으로 한글 폰트가 없어서 깨지는 문제도 해결해 보았습니다. 오늘 글을 참고해서 구글 크롬을 우분투에서 잘 사용하셨으면 좋겠습니다.
'IT' 카테고리의 다른 글
| 우분투에서 크롬 드라이버와 Selenium으로 headless(헤드리스) 웹 크롤링 문제 해결하기 (1) | 2024.09.23 |
|---|---|
| 파이썬으로 웹 페이지 크롤링 - 홈페이지 로그인 하기 (1) | 2024.09.23 |
| 워드프레스 블로그 홈페이지 1분만에 자동 목차 차례 만들고 적용하기 - 플러그인으로 가장 쉽게 하기 (9) | 2024.08.28 |
| 우분투 리눅스(ubuntu linux)에서 selenium으로 웹 크롤링 하기 (2) | 2024.08.17 |
| 파이썬(python3) 실행파일(exe) 만드는 법 - pyinstaller 설치부터 생성까지 (29) | 2024.07.22 |


